October 13, 2012

Art at the Mall

Hi all you Art Spotters out there!  This weekend is a very special weekend for spotting art.  That's because elementary students from Grandville Public Schools had the opportunity to display their artwork at the Rivertown Crossings Mall!  I hand-picked some very special artwork from Grand View, East, and West Elementary Schools to display in the upstairs food court.  Mr. Leonard, the other Grandville Elementary Art teacher, brought artwork from Central Elementary to display.

Check out our student's fantastic work!

Full View of Student Art at the Mall

Right half of Student Art at the Mall

3rd Grade Cityscapes at the Mall

3rd Grade Cityscapes and 5th Grade Pop Art Animals

5th Grade Pop Art Animals and 4th Grade Abstract Paintings
4th Grade Abstract Paintings and 2nd Grade Kandinsky Circles


 Here's Mr. Leonard's student artwork from Central Elementary.


The artwork looked fantastic hung up against the black fabric backdrops!  I already got to see a bunch of students and their families as they stopped by to check out their art.  I hope that everyone has a chance to see their work this weekend!  The show will stay up Saturday until 9pm through Sunday until 6pm.

Thanks for visiting The Art Spot!

-Miss O'Donnell

October 9, 2012

Absolutely Abstract

Hi there, thanks for joining me here at The Art Spot!

4th graders at Grand View, East, and West Elementary Schools have been busy learning about Russian painter Wassily Kandinsky.  They learned that Kandinsky loved to paint Abstractly.  An Abstract painting is one that is NOT representational.  For their project, 4th grade students learned to 'retrain' their brains, and paint Abstractly.  This was tricky for some students who were used to painting and drawing recognizable objects!  Once students learned that Abstract paintings are just made up of color, line, and shape they really started to get the hang of it.  It's just like doodling, only with paint!

Students also learned that Kandinsky loved listening to music while he painted.  So on our final days of painting students rocked out to The Beatles while they painted!

First we began our paintings using just the primary colors: Red, Blue, and Yellow.  We painted 'blobs' and lines, and tried not to make shapes that were recognizable.  As students soon found out however, many times we can see things in abstract paintings that remind us of other objects!  

Kandinsky Abstract with Primary Colors
Next we added Secondary colors: Green, Orange, and Purple.  But students weren't just given these colors....they had to mix them!!  They used the primary colors to mix all of the secondary colors.

Once they learned how to mix these new colors, they filled all of the white space of their papers with 'blobs' and lines.  They could use detailed brushes to make patterns and thinner lines on top of other shapes.  

Finally as a finishing touch, students could choose to add black or white details.  The results are stunning!

Check out some of the completed Abstract paintings. 

Kandinsky Abstract painting

Kandinsky Abstract painting

Kandinsky Abstract painting

Kandinsky Abstract painting
Great job 4th graders!  These Kandinsky Abstract paintings are truly beautiful!

See you back here at The Art Spot next time!

-Miss O'Donnell

Wowing Me With Warhol, Part 2

Hi Art Spotters!

It was an exciting day in my 5th grade classes at Grand View Elementary.  Today some students finished their Andy Warhol Pop Art Animal paintings!

In my Part 1 post, I showed you a few of the outstanding animal drawings that students had completed.  Once each student was done with one drawing, we made 3 other copies to end up with a total of 4 identical animal drawings.  (Depending on when students completed this step I either copied them on the school copier, or they traced them by hand.)

Once students had all 4 completed drawings....it was time to start painting!  We used 4 color schemes for our paintings: Primary, Secondary, and 2 different Analogous Color Schemes.

The amazing thing is that students made all of their colors by mixing different combinations of the Primary Colors!  They only had Red, Blue, and Yellow paints. All other colors were hand-mixed by students! Talk about impressive!

Primary colors: Red, Blue, and Yellow

Primary color Scheme

Secondary colors: Orange, Purple, and Green


Secondary Color Scheme

The last two drawings were painted using Analogous color schemes.  Analogous colors are those that are NEXT to each other on the color wheel.  Here's a color wheel so you can see the options that students had to paint their Analogous color schemes with.  They had to pick 3 colors that were next to each other.

Color Wheel
Students had many choices for their Analogous color schemes.  Here are the two that I chose for my examples:

Analogous color scheme #1: Blue, Blue-Green, and Green


Analogous Color Scheme

Analogous color scheme #2: Red, Red-Violet, and Violet

Analogous Color Scheme

Once students finished all 4 of their paintings, the final step was to go back over their line with Sharpie Marker (making sure to wait until their paint was COMPLETELY DRY before doing this!)

Then students mounted their paintings onto 12" x 12" black paper in the arrangement of their choice.  Here are some of the amazing results!  


Warhol Pop Art Animals

Warhol Pop Art Animals

Warhol Pop Art Animals

Warhol Pop Art Animals
I am so impressed with all of my 5th grader's Pop Art Animals!! The rest of my classes will be finishing up this project next week.  

Thanks for checking in at The Art Spot.  See you soon!

-Miss O'Donnell

Cool Cities

Hi everyone out there, thanks for joining me back here at The Art Spot! My students have been hard at work creating some amazing masterpieces!

3rd graders at Grand View, East, and West have been working on their Warm/Cool Cityscapes this week. (Thanks Mr. Leonard for this great project idea!)  This project combines watercolor painting with printmaking to create amazing silhouettes of cities.

Here is an example of a finished piece.

Warm/Cool Cityscape, Miss O'Donnell's example
The students first folded their papers in half to create an area for the sky and the water.  They then learned how to blend Warm colors together to create a beautiful sunset sky.  The Warm colors that they used were Red, Orange, and Yellow.

Here's what they looked like after the first day.

Sunsets painted with Warm colors
The next day of class students painted the water using Cool colors.  The Cool colors they used were Blue, Purple, and just a hint of Green.  They used a different painting technique for the water.  Instead of using long brush strokes from left to right, they tried using small shaky brushstrokes to create 'ripples' in the water.

Here's what they looked like after the second day.

Water painted with Cool colors
The next step was for students to create their cities.  Students first sketched their cities on paper and then transferred the cities onto Scratch-Foam.  Scratch-Foam is a thin piece of foam that you can press a drawing into and then roll ink onto and stamp. They made sure to press hard so that their drawing would transfer nicely. Once their city was drawn and their 'stamp' was cut out they were ready to print!

One by one, students could go to the printing station with their foam stamps and painted backgrounds.  We rolled black printing ink onto their city stamps and then pressed them firmly onto the sunset sky.  When we removed the foam, the city was revealed!  Then while the ink was still wet, we folded the paper in half and pressed firmly.  When we opened up the papers the city was then reflected in the water!

Here are some student's prints.  They came out so great!!!

Warm/Cool Cityscape

Warm/Cool Cityscape

Warm/Cool Cityscape

These came out great, I am so proud of my 3rd graders!  We'll take next week to finish these up, but so far about 1/3 of my 3rd graders are finished. Keep up the good work guys!

Thanks for taking time to check on The Art Spot today!

-Miss O'Donnell


September 26, 2012

Wowing me with Warhol, Part 1

Hi there Art Spotters!  I'm back from a mini vacay in Arizona this weekend for my little sis's wedding.  It was a great time, but I'm glad to be back to the classroom working on our first projects of the school year!

Here's a sneak peek at what my 5th graders have been hard at work on here in Grandville.  Students have been learning all about color theory for this project.  I love color, and so do they!!  Color is one of the Elements of Art, and our world (and art) just wouldn't be as exciting without it.  So for this project I have been teaching my students about the life and artwork of the very talented Andy Warhol. Can I get a War-Hollah?!!  (sorry, I couldn't help myself!) they have also been learning about the Pop Art movement, and Warhol's influence during this movement.

Andy Warhol, Prince of Pop Art
For this project, students viewed some of Warhol's most recognized work.  Many of them had seen images of his Campbell's Soup Can collection and Marilyn Monroe screenprints before!  (One student even mentioned seeing brightly colored Campbell's Soup Cans at Target recently....I've gotta' get my hands on some of those!).

Andy Warhol, Cambell's Coup Can collection

Andy Warhol, Marilyn Monroe collection
I knew I wanted to make this first project a painting project that focused on color mixing with an influence from Andy Warhol's bright Pop Art colors.  So when I came across this project over on Mrs. Picasso's Art Blog, I knew I wanted to borrow it!  Thank you Mrs. Pannell (aka Mrs. Picasso)!

And so 5th graders at Grand View, East, and West will be making their very own four panel Pop Art animal paintings based on Andy Warhol's Endangered Species screenprints!

Here are two of the images of Warhol's endangered animal screenprints that students viewed before we started.

Andy Warhol, Ram screenprint

Andy Warhol, Rhino screenprint
Step one of this project was to have students draw a simplified Contour Line drawing of the animal of their choice.  (A Contour Line drawing is one which is only made up of an outline, no shading or small details allowed!) Students did not have to choose an endangered animal for this, and could look at images of animals from our classroom collection of pictures.

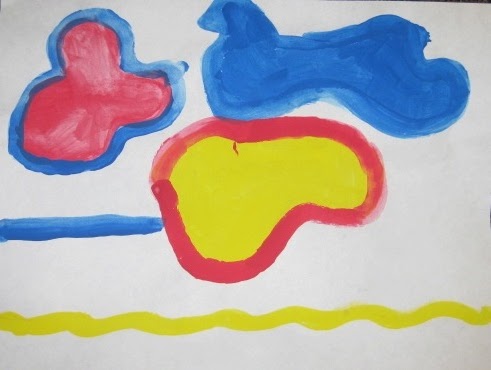
Here's my example (this image is before I mounted the 4 paintings.  As a final step students will mount their 4 paintings onto a 12" x 12" paper.) Also, the bottom right painting is still wet! That explains the darker areas...oops!

Miss O'Donnell's example:  Primary, Secondary, Warm analogous, and Cool Analogous color schemes


I am so excited about how these drawings turned out!! Here are a few of the 'stand-out' drawings from Mrs. Burgess's class at Grand View.  There were so many amazing drawings that I had a hard time picking just a few....so if you don't see your drawing up here that doesn't mean that it wasn't just as fantastic! There's just not enough room, maybe you'll see it posted here later when it's painted!


Aren't these amazing?!!  I can't wait to see the final product.  Our next step is to copy each of these images (students who were finished by the end of class gave me their pics and I copied them 3 times on the copy machine to save time.....students who were not finished will simply trace their original image 3 times since the paper is thin enough to see through.)

Then it will be time to paint.  Students will only get the three Primary colors (red, blue, and yellow) to paint four different color schemes on each of their four images.  This will be a great learning experience on color theory and mixing!  We'll use Primary, Secondary, Warm, Cool, and Analogous color schemes.

Stay tuned for updates and more images of this project!!

Thanks for reading all the way to the bottom!
- Miss O'Donnell

September 16, 2012

Artist's Pledge

Hi everybody! Thanks so much for checking back with me here at The Art Spot! Lately there has been quite a buzz going around about Social Contracts within the classroom.  A social contract is a great first day project that can have a huge impact on the rest of the school year.  I decided to try it out in my three Art classrooms and pair it with our discussion of The Art Room Rules poster.

Of course I couldn't just do an ordinary plain poster that everyone just signs with their name.  This is an Art room after all!  And so was born the Artist's Pledge Paint Palette!

Artist's Pledge Paint Palette
The giant paint palette and paint brush were made by simply drawing the images on paper (the kind from those huge rolls used for covering bulletin boards) and then painting them with Tempera paints and cutting them out.  I then positioned them where I wanted on the bulletin board and stapled all around the edges.  The paint splotches were cut out of foam core (so they are 3-D) and attached using small pieces of Velcro.  This makes it easy to pull off for those students who are a little too short to reach, and next semester/year when I get new classes I can simply replace them with new pieces.

Each paint splotch has a different class code written on it to keep the classes straight!  This semester I have 12 classes at Grand View, the perfect number to make each spot a different color from the Color Wheel!

So the first day of class, after a quick introduction over at the "Meet Miss O'Donnell" bulletin board, and a read-through of the Art Room Rules, we headed over to the The Artist's Pledge board and read the description up in the top left corner.  It says:

With this fingerprint, I 
pledge to do my best to follow the
Art Room Rules

So you probably guessed it by now....instead of the students signing their names to make this pledge, they would be stamping their fingerprints to fill up the paint splotches!  (Just use ordinary Tempera paint rolled onto a printing palette) The kids loved it, especially because they got to get a little messy on the very first day of Art class!

Classroom Tip: After students are done stamping their fingerprint, don't waste time by having them wash their hands at the sink.  Dampen a large sponge and let them just rub away the paint on their one little finger!

Here's a pic of the Paint Palette after the first day.  I saw six classes that day and so six spots where filled in.  (The first class of the day got cut short a little because of the morning announcements/pledge of allegiance and so that spot is a little bare because only half the the class had time to stamp.)

Paint Palette half-way filled
And here's a pic of the Paint Palette completely done after the second day.  I just love how colorful it came out!  

Paint Palette completed

And now every class has made their pledge to try their best to follow the Art Room Rules.  Any time there is an issue with a student not following the Art Room Rules, we can visit the Artist's Pledge bulletin board and find their fingerprint and talk about ways to improve next time.

Check back soon here at The Art Spot to see my other Artist's Pledge boards from East and West Elementary Schools!

September 15, 2012

Setting Up My Classrooms

That's right folks.....Classrooms.....plural.....with an 'S'.  This year I'm teaching at three different Elementary Schools in the Grandville district.  Grand View, East, and West Elementary are where I call home.  This means that all of my usual beginning-of-the-year set-up will be x3!

I put in the most work at Grand View since this classroom will not only be my 'home base' (I teach there two full days during the week) but it's also the school where I get my very own Art Classroom! (So excited about this!!) At East Elementary I will be sharing my room with the Science Lab teacher (shout-out to the wonderful Ms. Priest!) and at West Elementary I share my room with Science Lab (Mr. Staggs) and Music (hi Ms. Bernat!). 

After a whole lot of cleaning, organizing, and rearranging.....my room at Grand View was finally looking decent!

Grand View Classroom

Hanging above each of the seven table groups is a poster with a well-known artist's name and images of their artwork.  Paul Klee, Vincent Van Gogh, Georgia O'Keeffe, Wassily Kandinsky, Claude Monet, Piet Mondrian, and Pablo Picasso.  These are the names of each group.  So during class when I need certain groups to get supplies or line up, I simply call them by their group name.  Not only does this help in classroom organization and management.....but it also gets the students familiar with these artist's names!

Here's a close-up of the Art Room Rules poster that I made which you can see in the far corner.  (I had to take the picture at an angle to cut down on glare.)

Art Room Rules Poster
Thanks goes out to Ashley Perry Photography for the great idea for this poster!

Here's a look at the classroom from the other side.

Grand View Classroom
 Here's a close-up of the "Meet Miss O'Donnell" bulletin board by the door.  The first day of class included a quick stop over to this area so that I could introduce myself to all of my new students and give them a little glimpse into my life!

Meet Miss O'Donnell bulletin board
On it I included pictures of my family, my cat Phoebe (pretty much my child), a map of my trip from Arizona to Michigan, me at the Grand Canyon, and a few of my paintings.

Well, that's a quick over-view of some of the things I have added to my Grand view classroom!  It's far from complete, but it's getting there!  I plan on filling it with posters, bulletin boards, and tons of Art visuals as the year progresses.  I just have to keep reminding myself that Rome wasn't built in a day.....and the same goes for my 3 Art Classrooms!

A Fresh Start

Welcome to The Art Spot!  Hi, I'm Miss O'Donnell, Art teacher at Grand View, East, and West Elementary Schools.  I have been teaching Art in Phoenix, Arizona for the past three years, and loving every minute of it.  But it was time for me to return to my home state of Michigan! I just moved back about a month ago, and I am thrilled to now be a part of Grandville Public Schools.  I'd like to use this blog as a place to share all that happens in my Art classes.

I'm a little late setting up this blog, as we are already two weeks into our school year! So the first few posts will be a recap of what's been going on.   I hope you can check back every week to see what's been happening at The Art Spot!